
Create a schema in the dashboard.
A table has to exist before anything can be written to it. This page registers one entirely from the console - no SDK, no cURL. You'll use the Schema designer, its visual Builder, the raw TOML manifest behind it, and the Index config dialog for full-text and vector settings. The table built here - shop.orders - is the same one the quickstart uses, so the two pages tell one story.
You need a running instance. If you don't have one yet, start at Create a free account.
Where schemas live.
In the console sidebar, open Data → Schema. Every table registered on the instance selected in the top bar is drawn as a node on one canvas; the lines between nodes are relations, labelled with the column that points across.
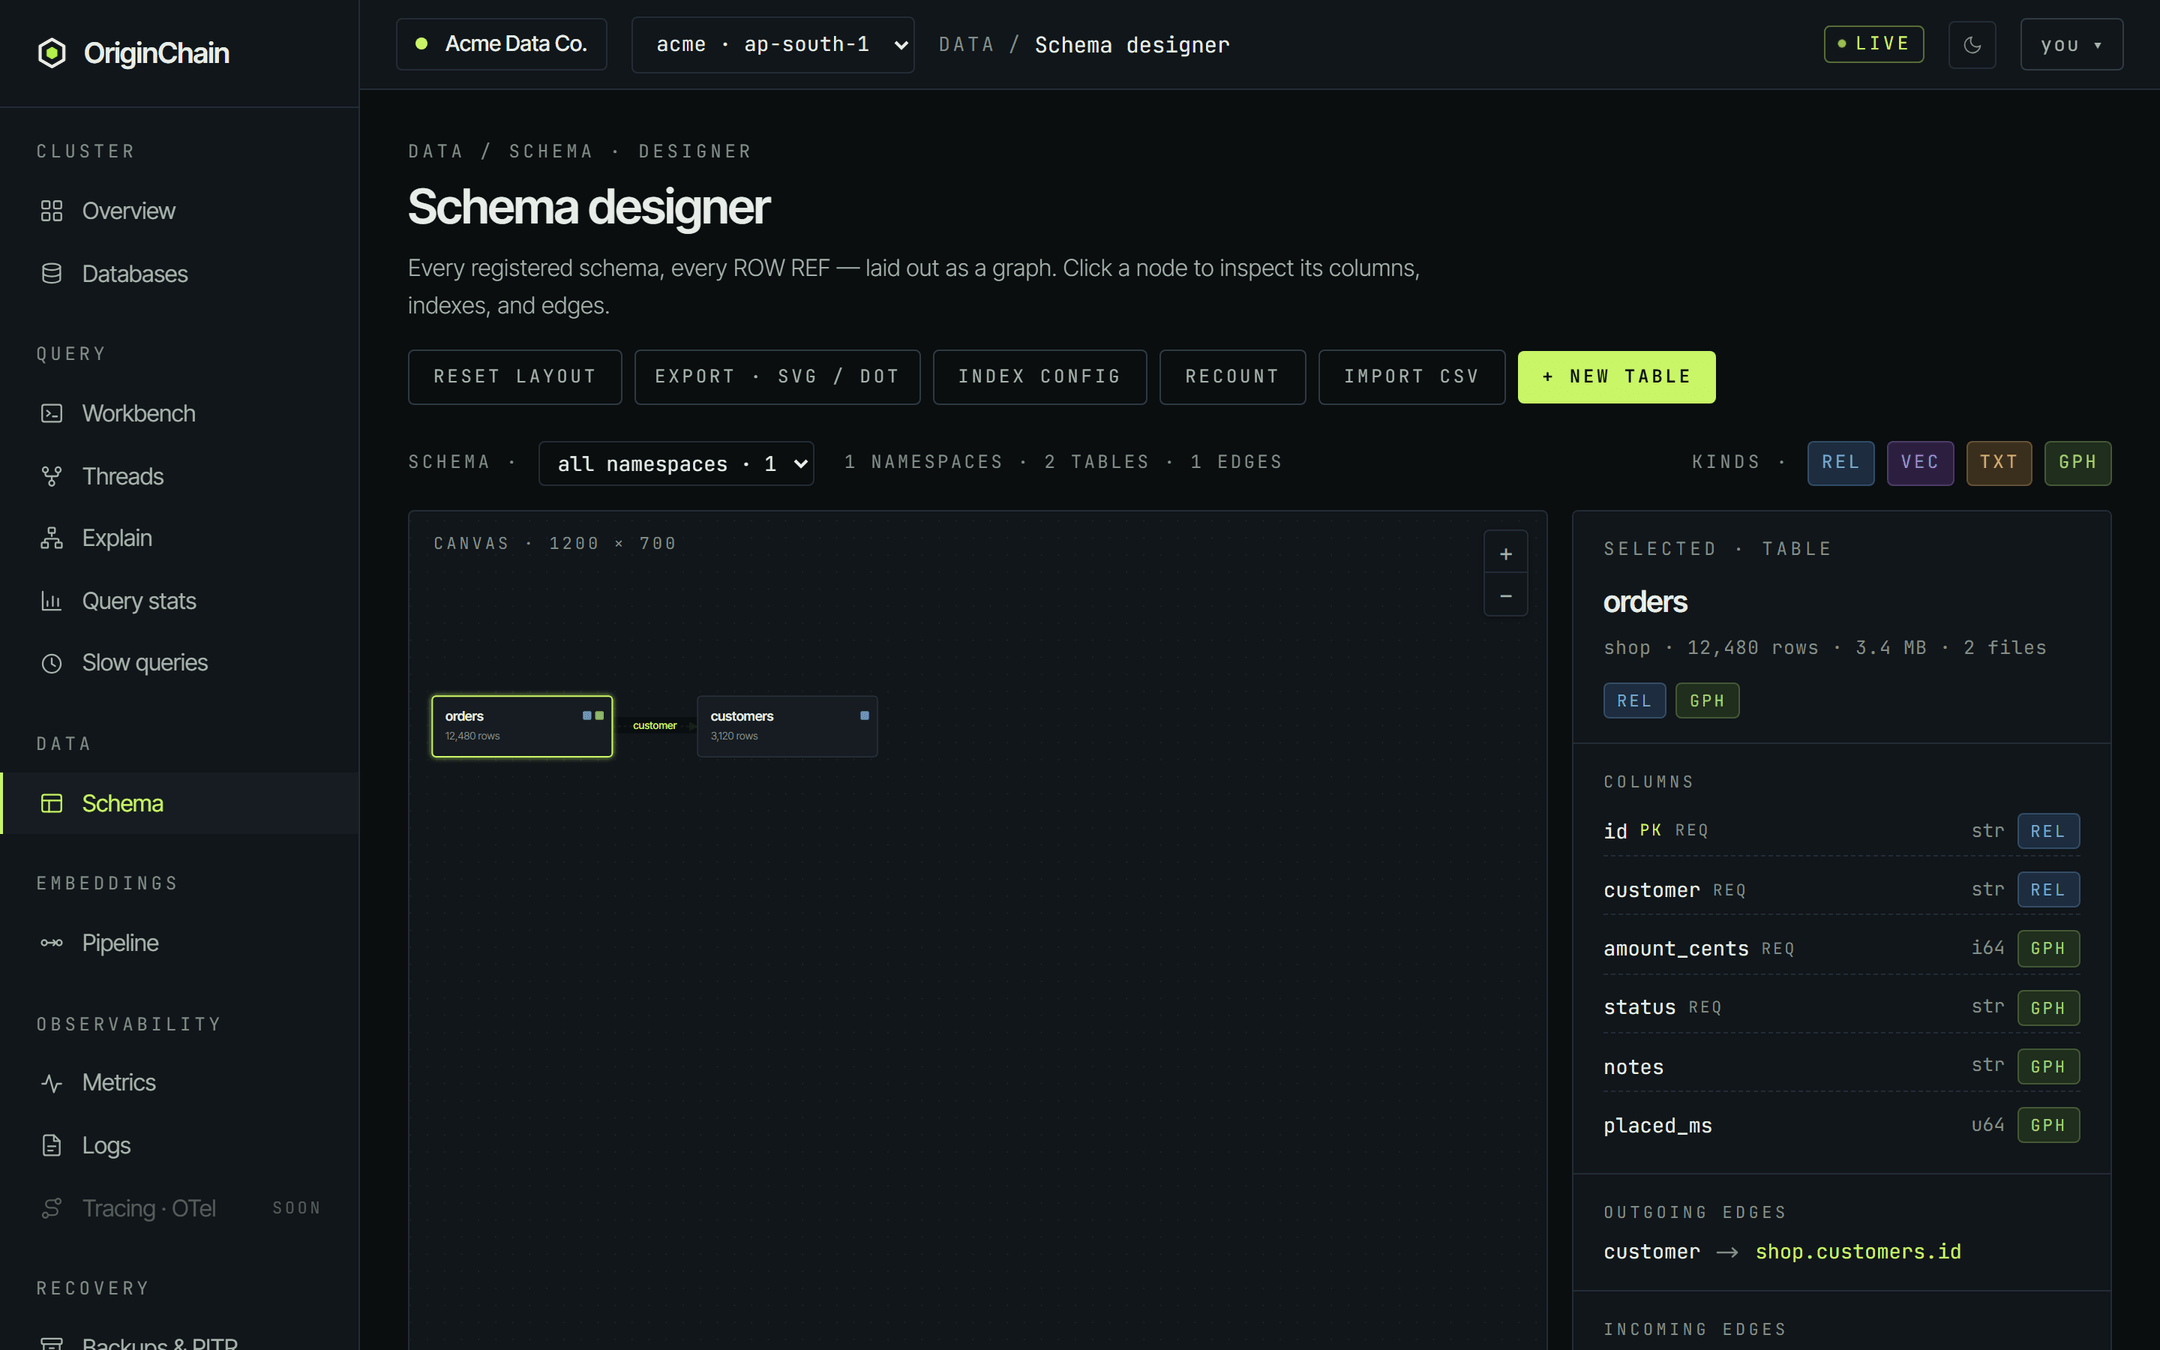
Every table is identified by namespace.table - here, shop.orders. A namespace is a grouping label, not an object you create: there is no "new namespace" button, and no separate step to make one. You type a namespace when you register a table, and it appears in the all namespaces dropdown as soon as a table uses it. SQL refers to tables by the full two-part name.
- + New table - opens the register dialog. This is the main event; sections 2 and 3 cover it.
- Import CSV - creates a table from a CSV header and loads the rows in one go. Covered on Insert data from the dashboard.
- Index config - full-text and vector settings, which are not table columns. Section 5.
- Recount - recomputes exact row counts. The sidebar figure is a live counter that can read high after a lot of updates; this corrects it, and it runs off the write path.
- Export · SVG / DOT - downloads the canvas as an SVG image or a Graphviz DOT file.
- Reset layout - you can drag nodes around, and the arrangement is saved to your account for that instance. Reset puts them back on the automatic layout.
Each column carries a small chip. REL marks a column that sources a relation to another table; GPH marks a plain field. The VEC and TXT filter chips in the toolbar are placeholders - vector and full-text structures aren't tagged onto columns yet, so those filters currently match nothing.
Variant A - the visual builder.
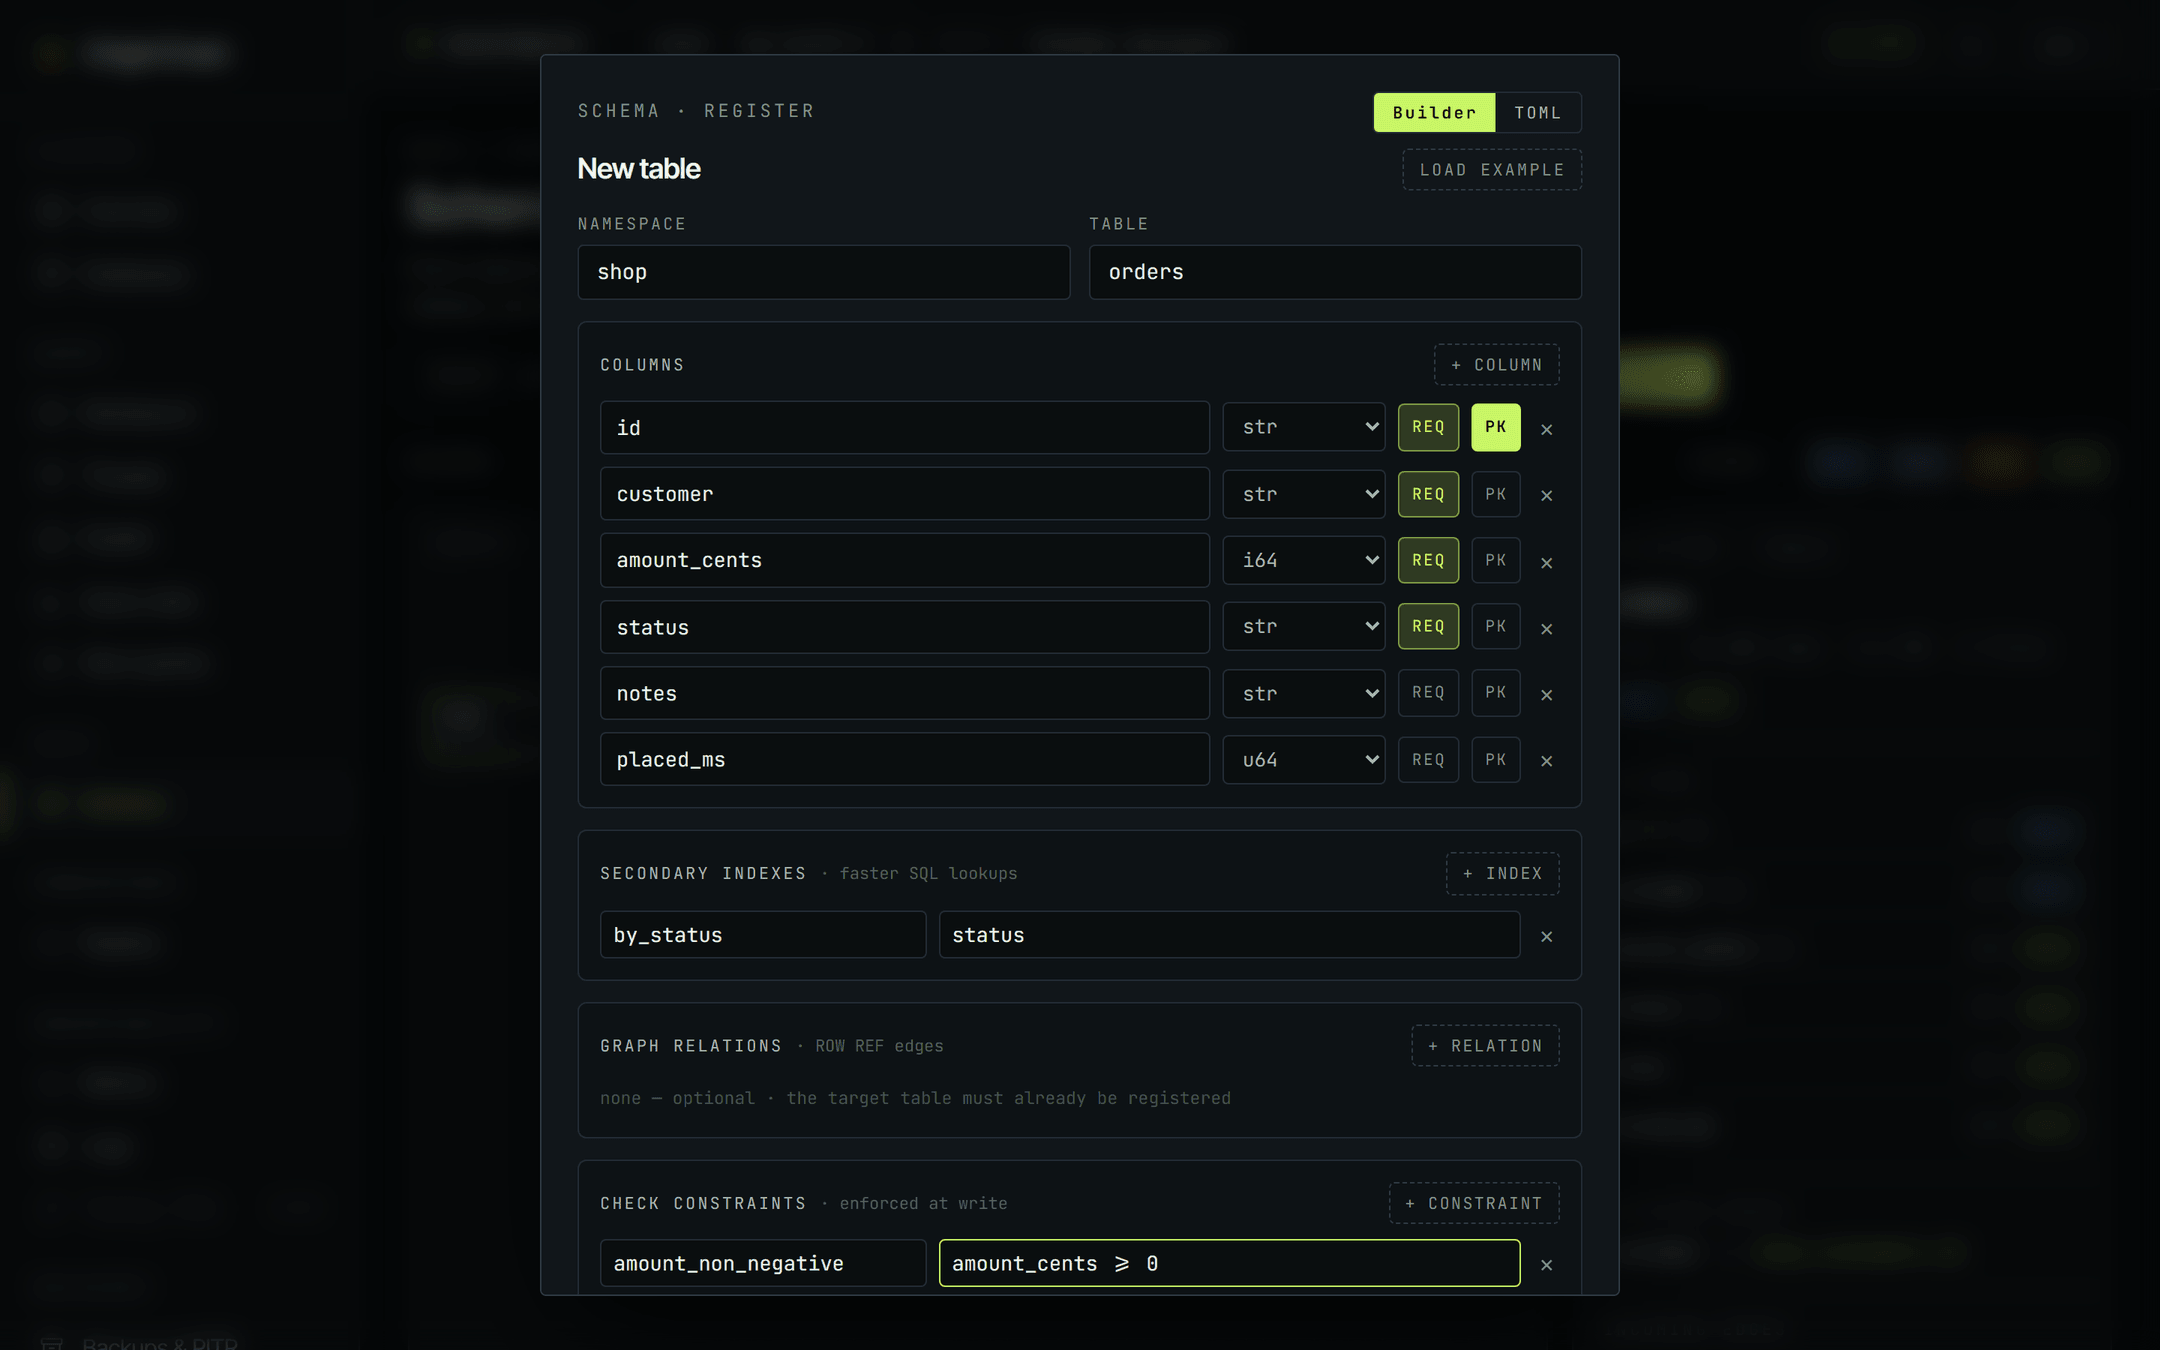
Click + New table. The dialog opens in Builder mode with a single starter column. Fill it in top to bottom:
- Namespace and table. Type
shopandorders. - Columns. Use + column for each one. Every row is a name, a type dropdown, and two toggles -
REQ(required) andPK(primary key). The × at the end removes a row. - Secondary indexes (optional). A name plus a comma-separated column list. These make SQL lookups on those columns cheaper.
- Graph relations (optional). A name, the local column, then the target namespace, table and primary key. The target table must already be registered - the dialog says so, and registering against a table that doesn't exist yet fails validation.
- Check constraints (optional). A name and an expression such as
amount_cents >= 0, enforced on every write. - Click Register.
Eleven, in this order:
| str | Text. Use it for IDs, ULIDs, UUIDs travelling as text, and anything with leading zeros. |
| i64 · u64 | Signed and unsigned 64-bit integers. Money in minor units, counters, epoch milliseconds. |
| f64 | 64-bit float. |
| bool | True / false. |
| bytes | Raw binary. |
| timestamp · uuid | Dedicated time and UUID types. |
| decimal · enum | The Builder can pick the type, but not its parameters - decimal precision and enum variants need the TOML pane. |
| json | A nested document in one column. |
Vector embeddings and full-text search are not column types here - they're configured separately, in Index config.
- A table name is present - otherwise
enter a table name. - No column is left unnamed -
column 3 has no name - name it or remove the row. An unnamed column would silently vanish from the manifest, so it's caught here instead. - At least one column has
PKticked -tick at least one PK column.
Anything past that is the engine's call. If it rejects the manifest, the reason appears in red at the bottom-left of the dialog and nothing is created.
Variant B - the TOML manifest.
The TOML toggle in the top right of the same dialog swaps the form for an editable manifest - the exact text the engine stores. Switching to TOML regenerates it from whatever the Builder currently holds, so you can lay a table out visually and then hand-finish it.
You can also paste a manifest straight in - handy for copying a table between instances, or for the things the form can't express: enum variants, decimal precision, and foreign-key actions.
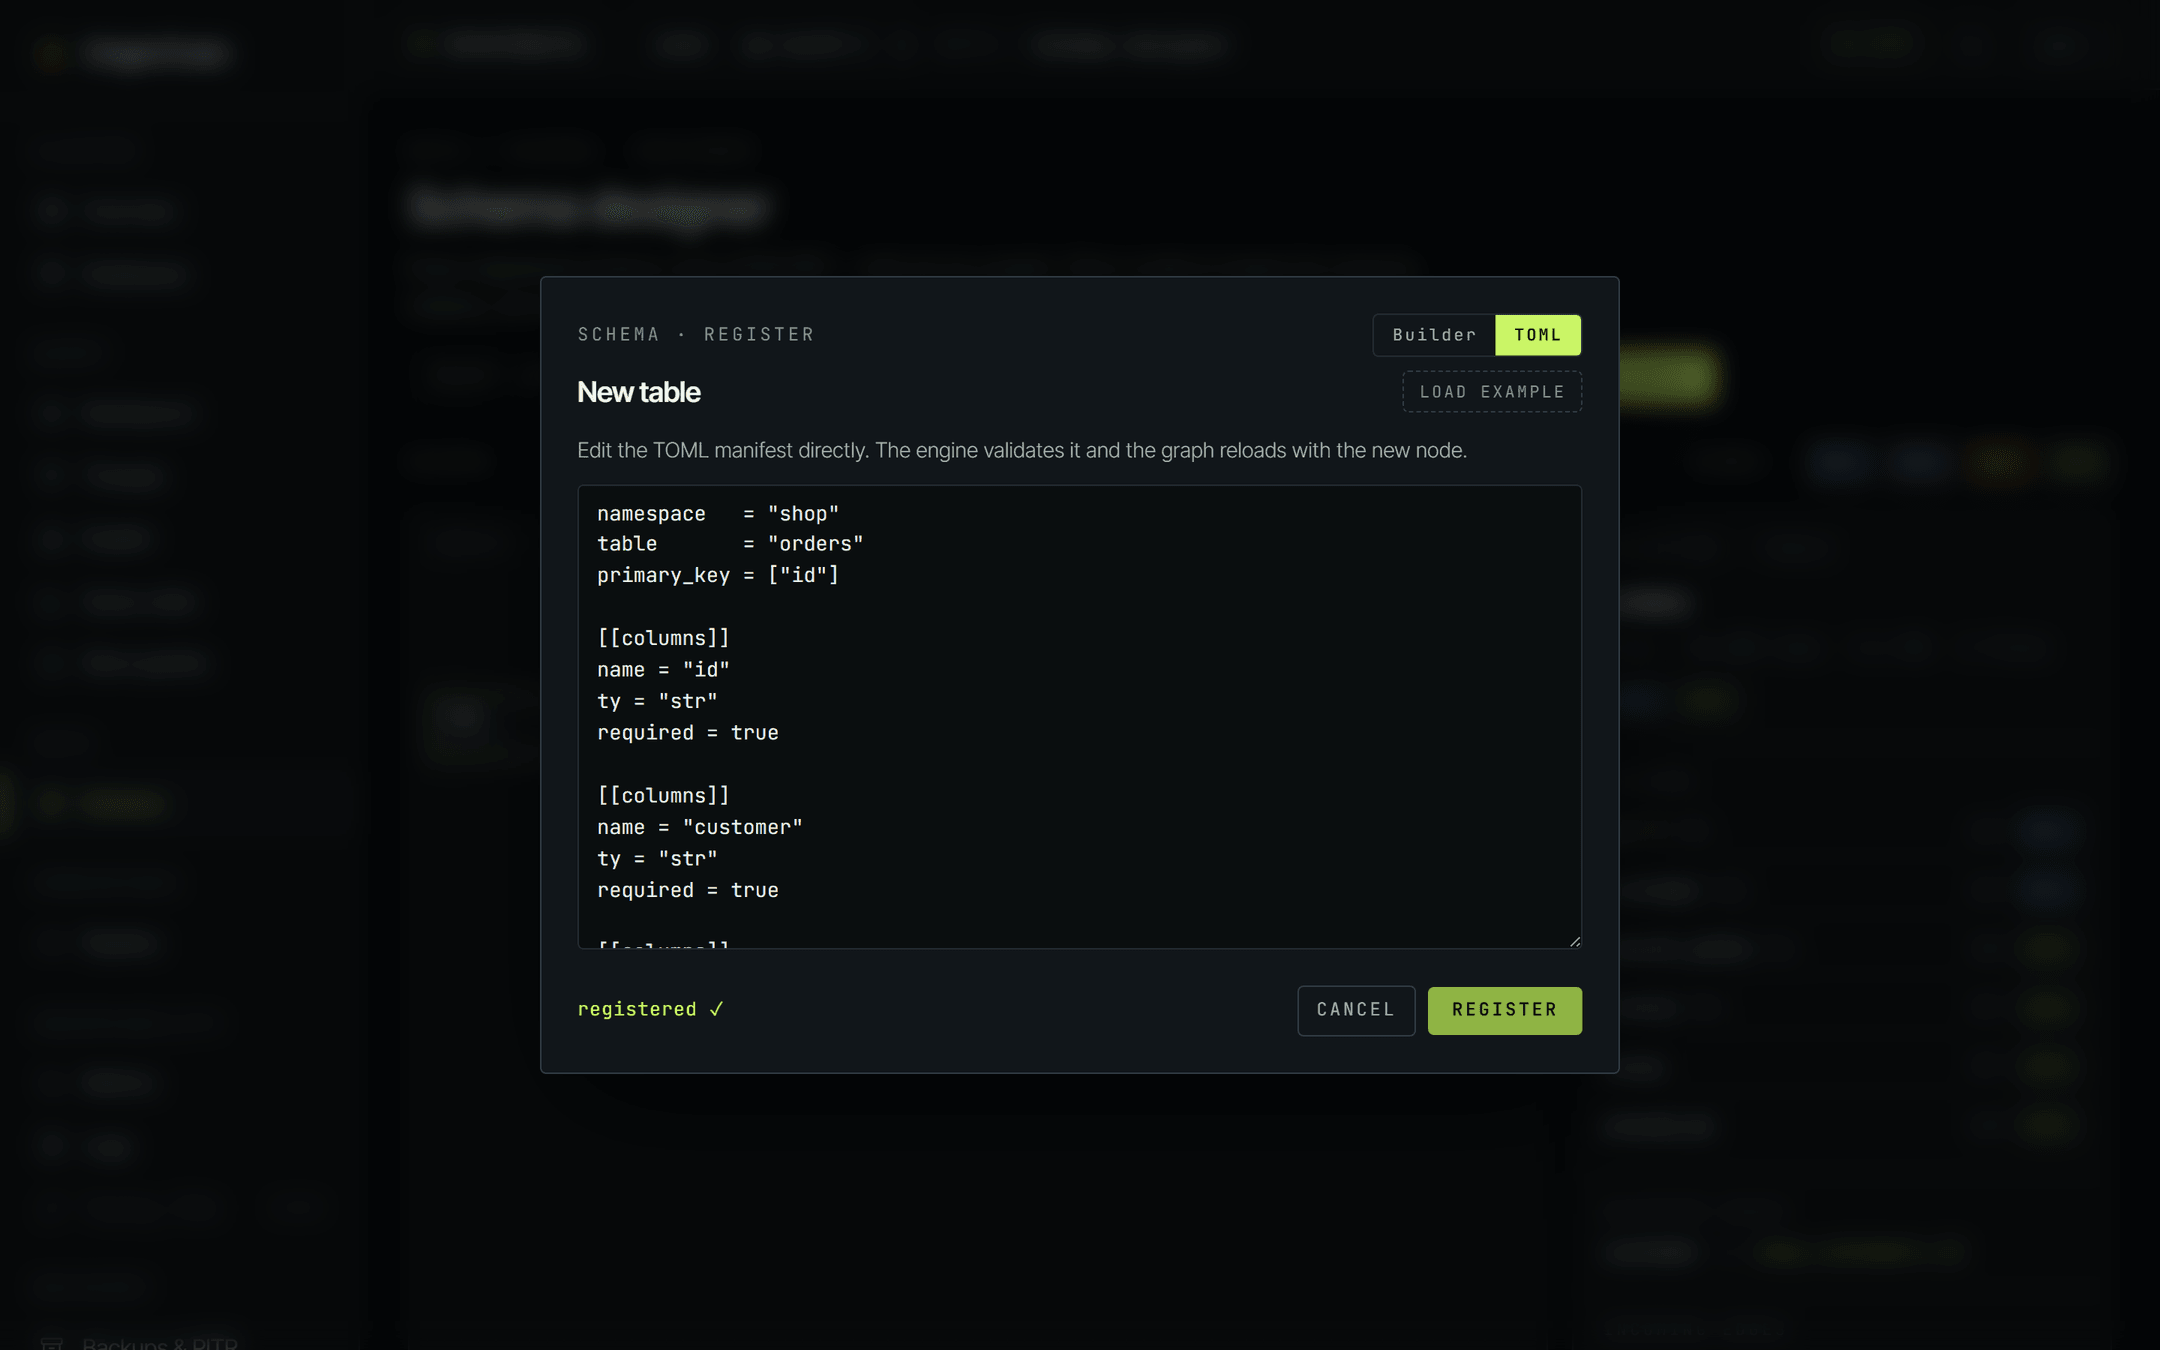
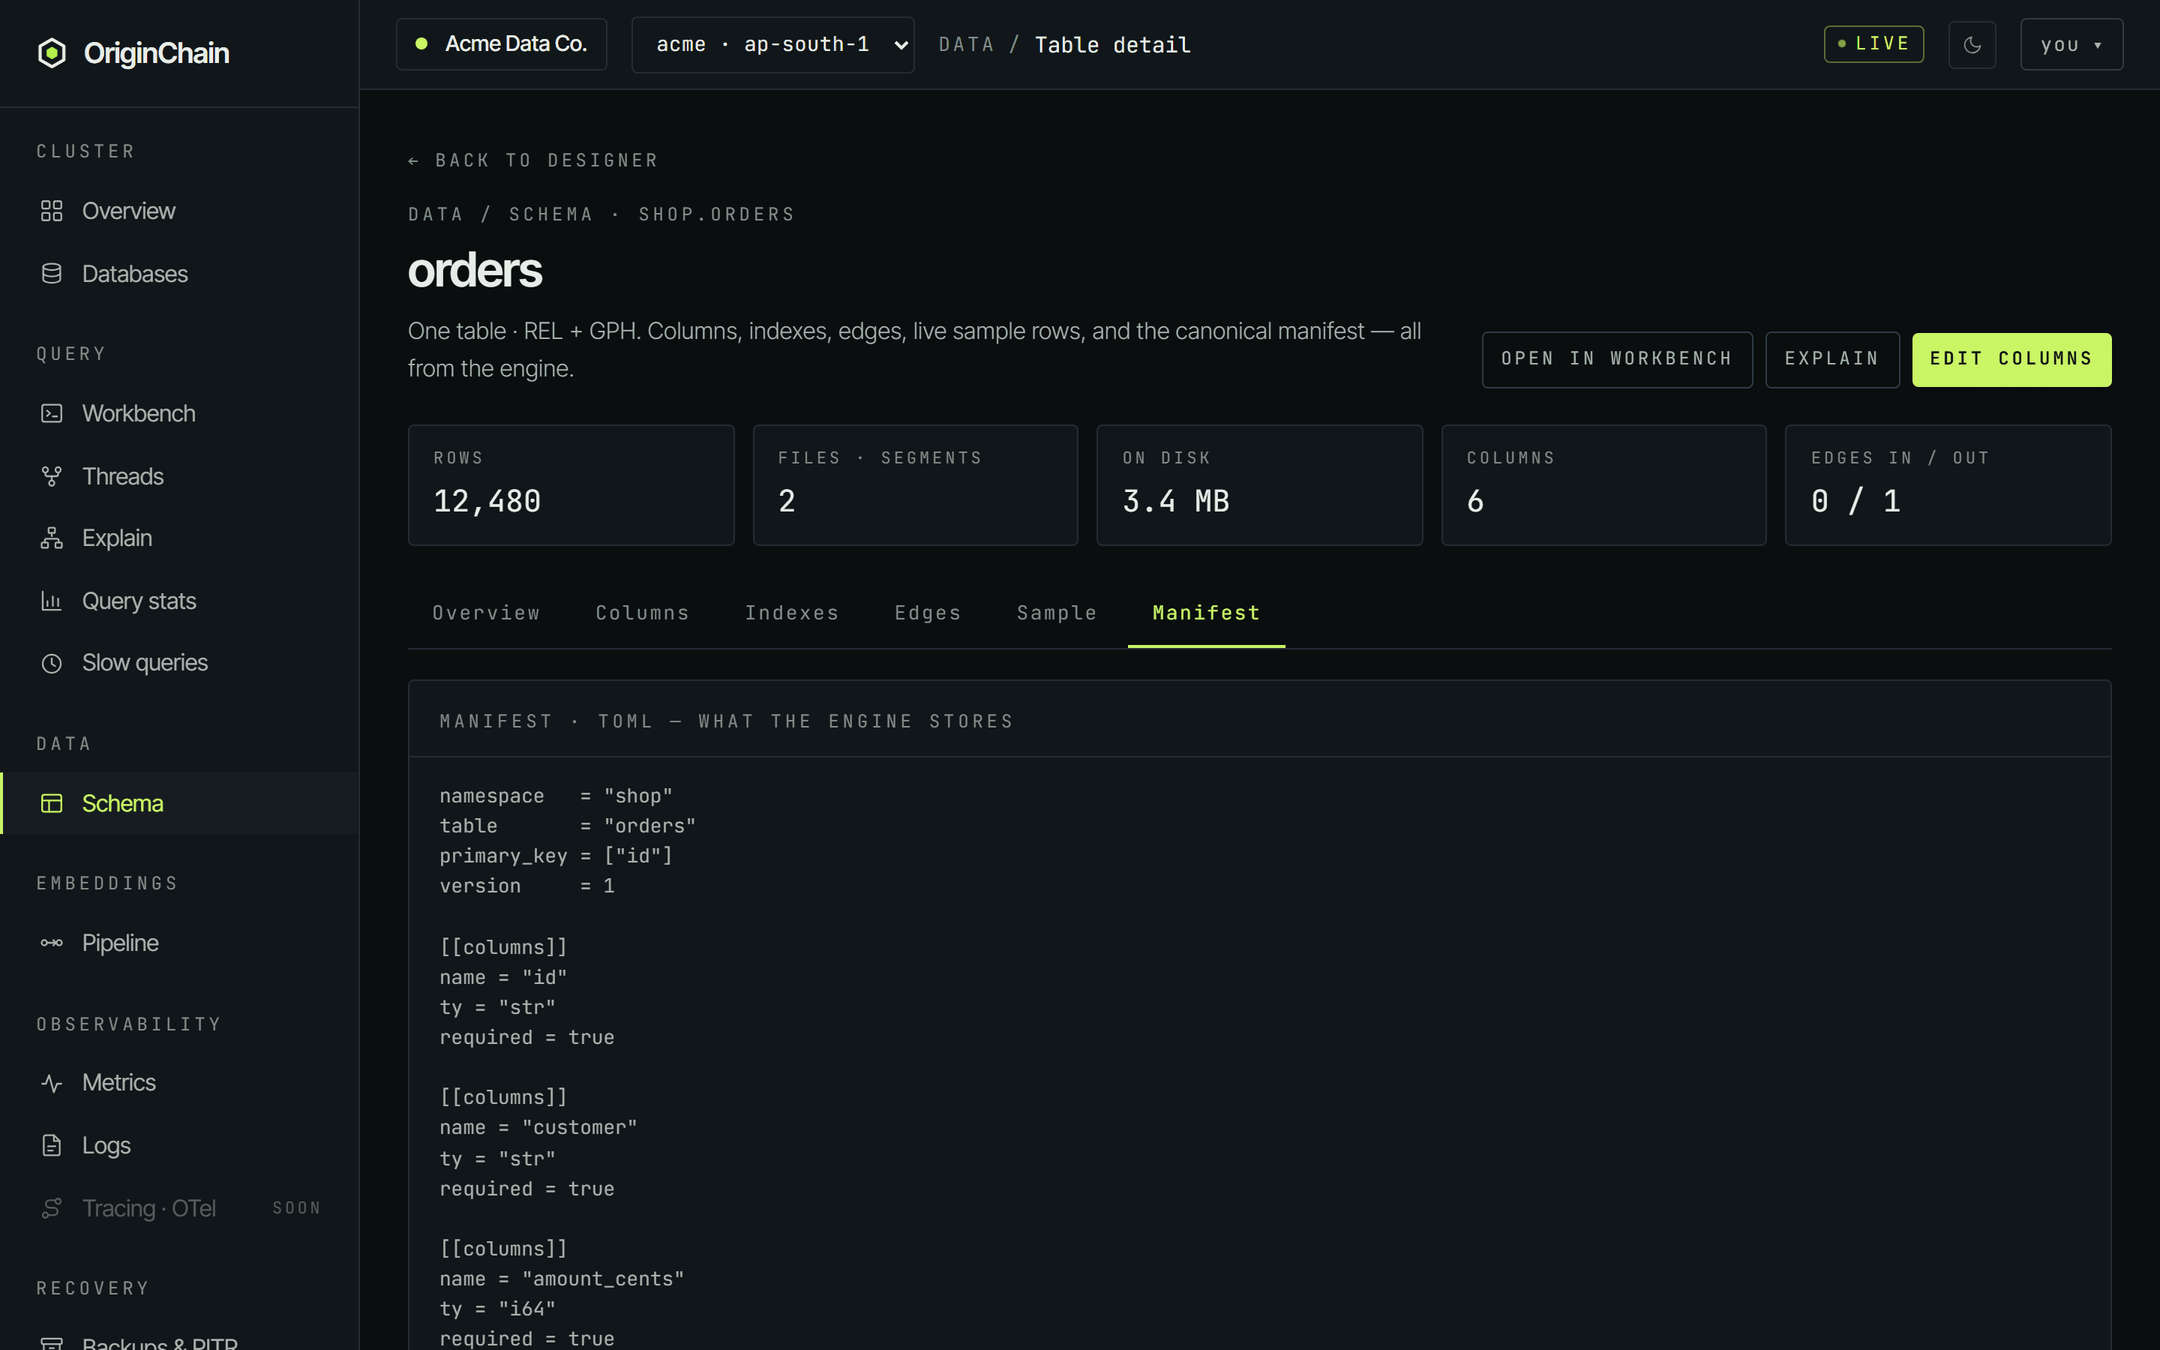
The textarea shows about a dozen lines at a time (drag its bottom-right corner to grow it). Here it is in full - paste this and it registers as-is:
namespace   = "shop"
table       = "orders"
primary_key = ["id"]

[[columns]]
name = "id"
ty = "str"
required = true

[[columns]]
name = "customer"
ty = "str"
required = true

[[columns]]
name = "amount_cents"
ty = "i64"
required = true

[[columns]]
name = "status"
ty = "str"
required = true

[[columns]]
name = "notes"
ty = "str"

[[columns]]
name = "placed_ms"
ty = "u64"

[[indexes]]
name = "by_status"
columns = ["status"]

[[check_constraints]]
name = "amount_non_negative"
expression = "amount_cents >= 0"
Relations get their own block. Add one only once the target table exists:
[[relations]]
name = "placed_by"
from_col = "customer"
target = { namespace = "shop", table = "customers", pk = "id" }
bidirectional = trueThe two modes are not two views of the same state. Builder → TOML regenerates the manifest from the form. TOML → Builder does not parse your text back into the form - and because the Builder becomes the submit source again, hand-edits made in the TOML pane are dropped. If you edit the manifest, stay in TOML and press Register from there.
The same manifest format works from code - see Schemas for the field-by-field reference and the SDK calls.
Load example.
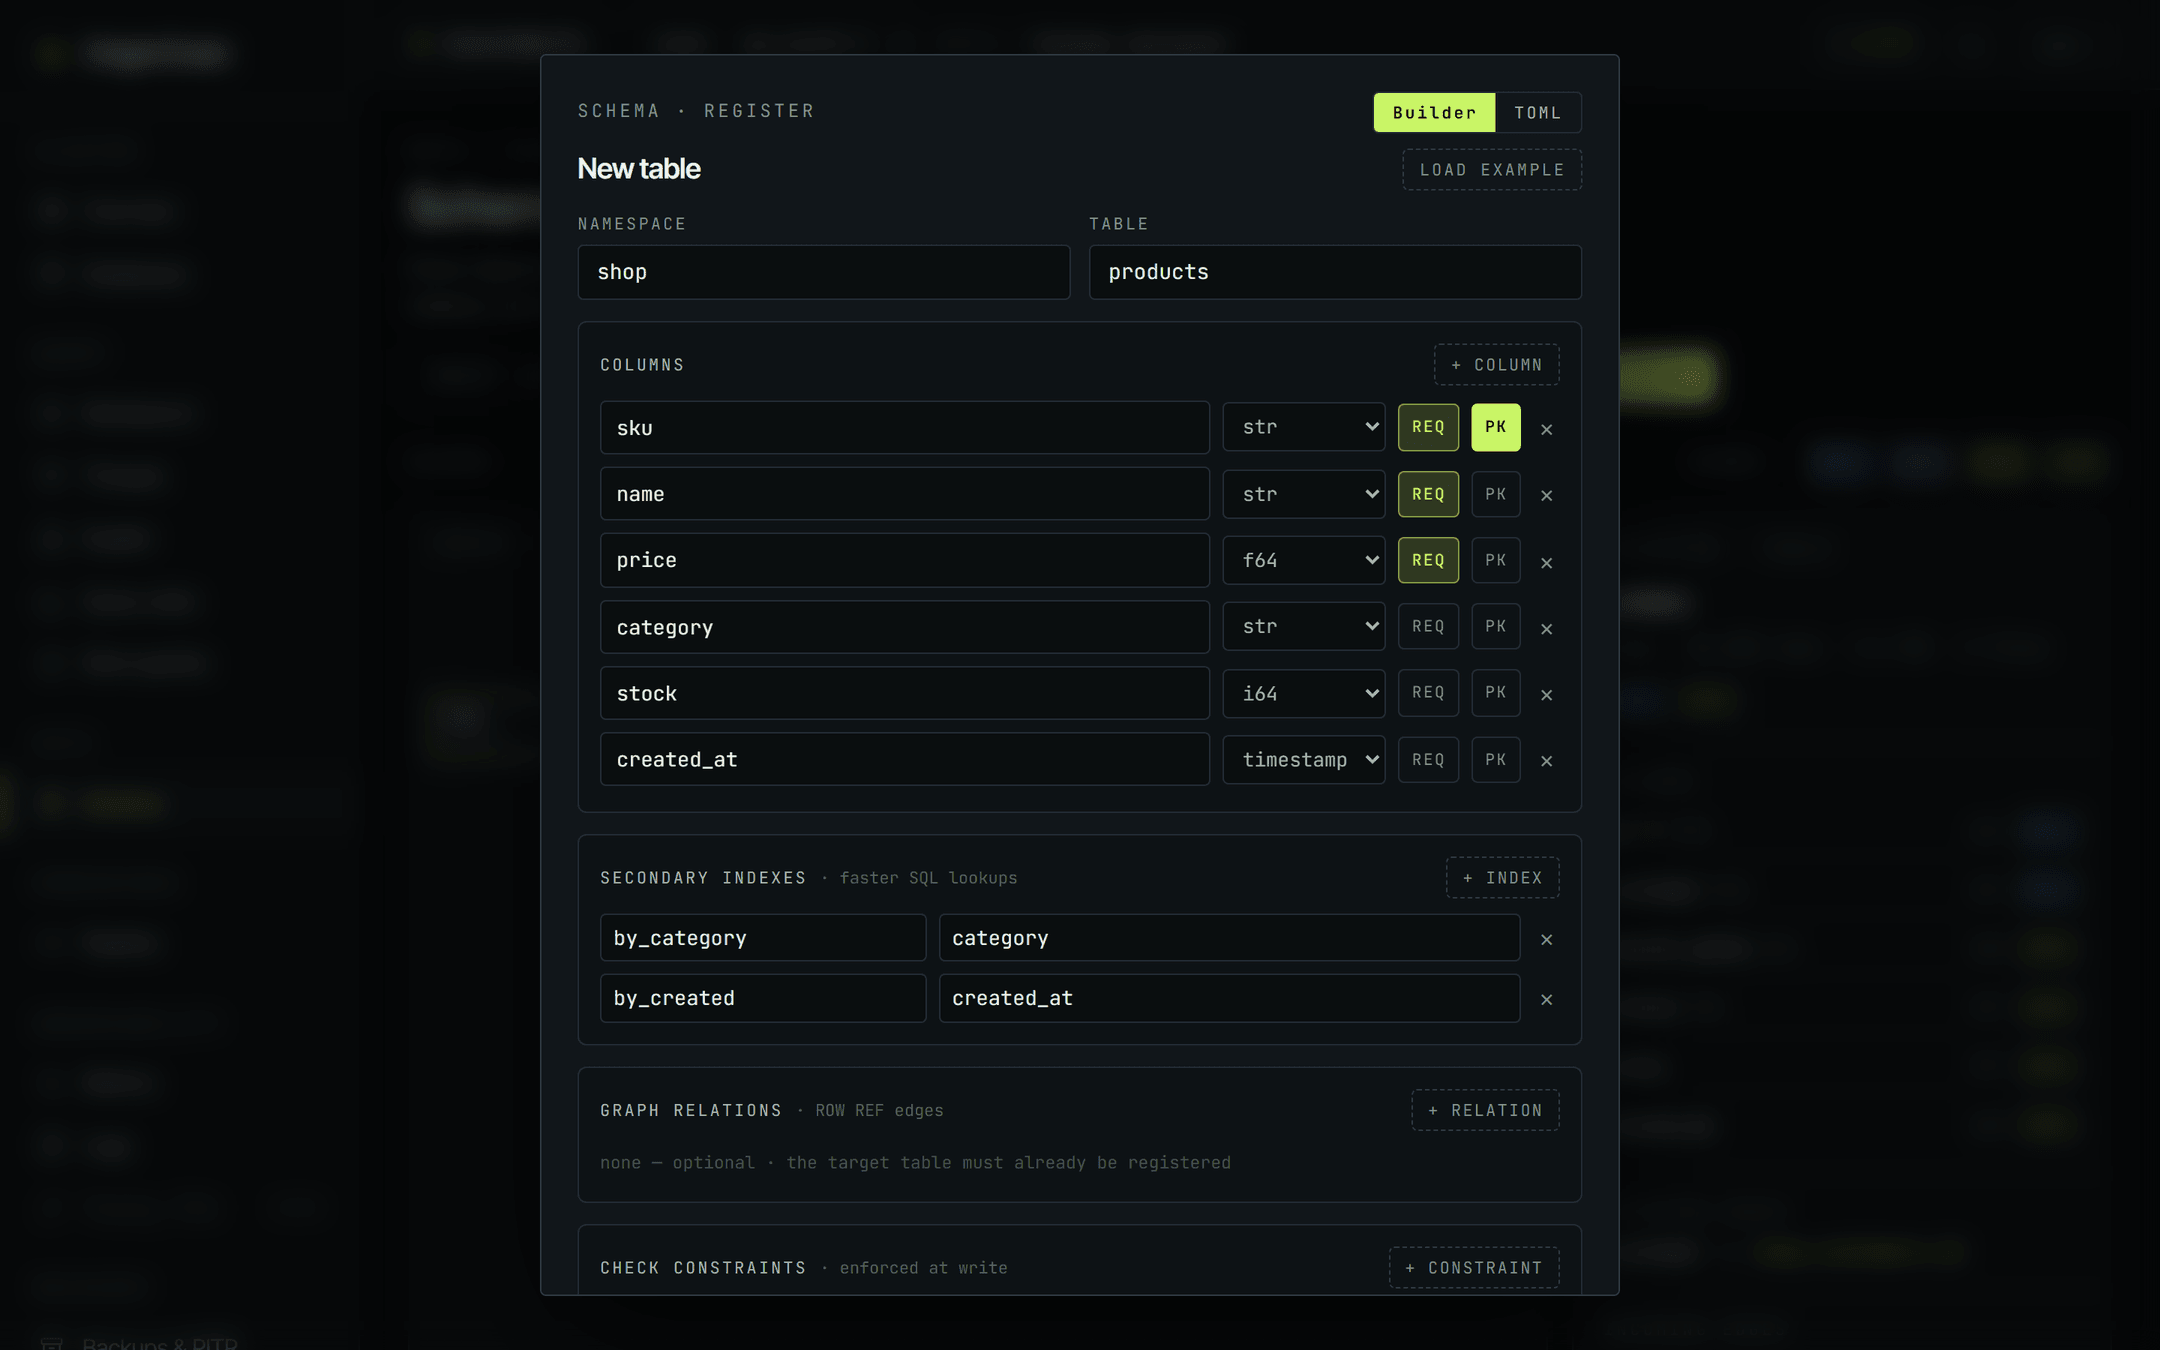
If you'd rather start from something that already works, hit Load example. It fills the Builder with a complete shop.products table - seven columns spanning str, f64, i64, timestamp and json, two secondary indexes, and one check constraint. Rename anything you like, or press Register and it lands as-is.
Index config: full-text and vector.
Index config in the designer toolbar opens a dialog with two tabs - Full-text and Vector. Those are the only two; there is no third tab.
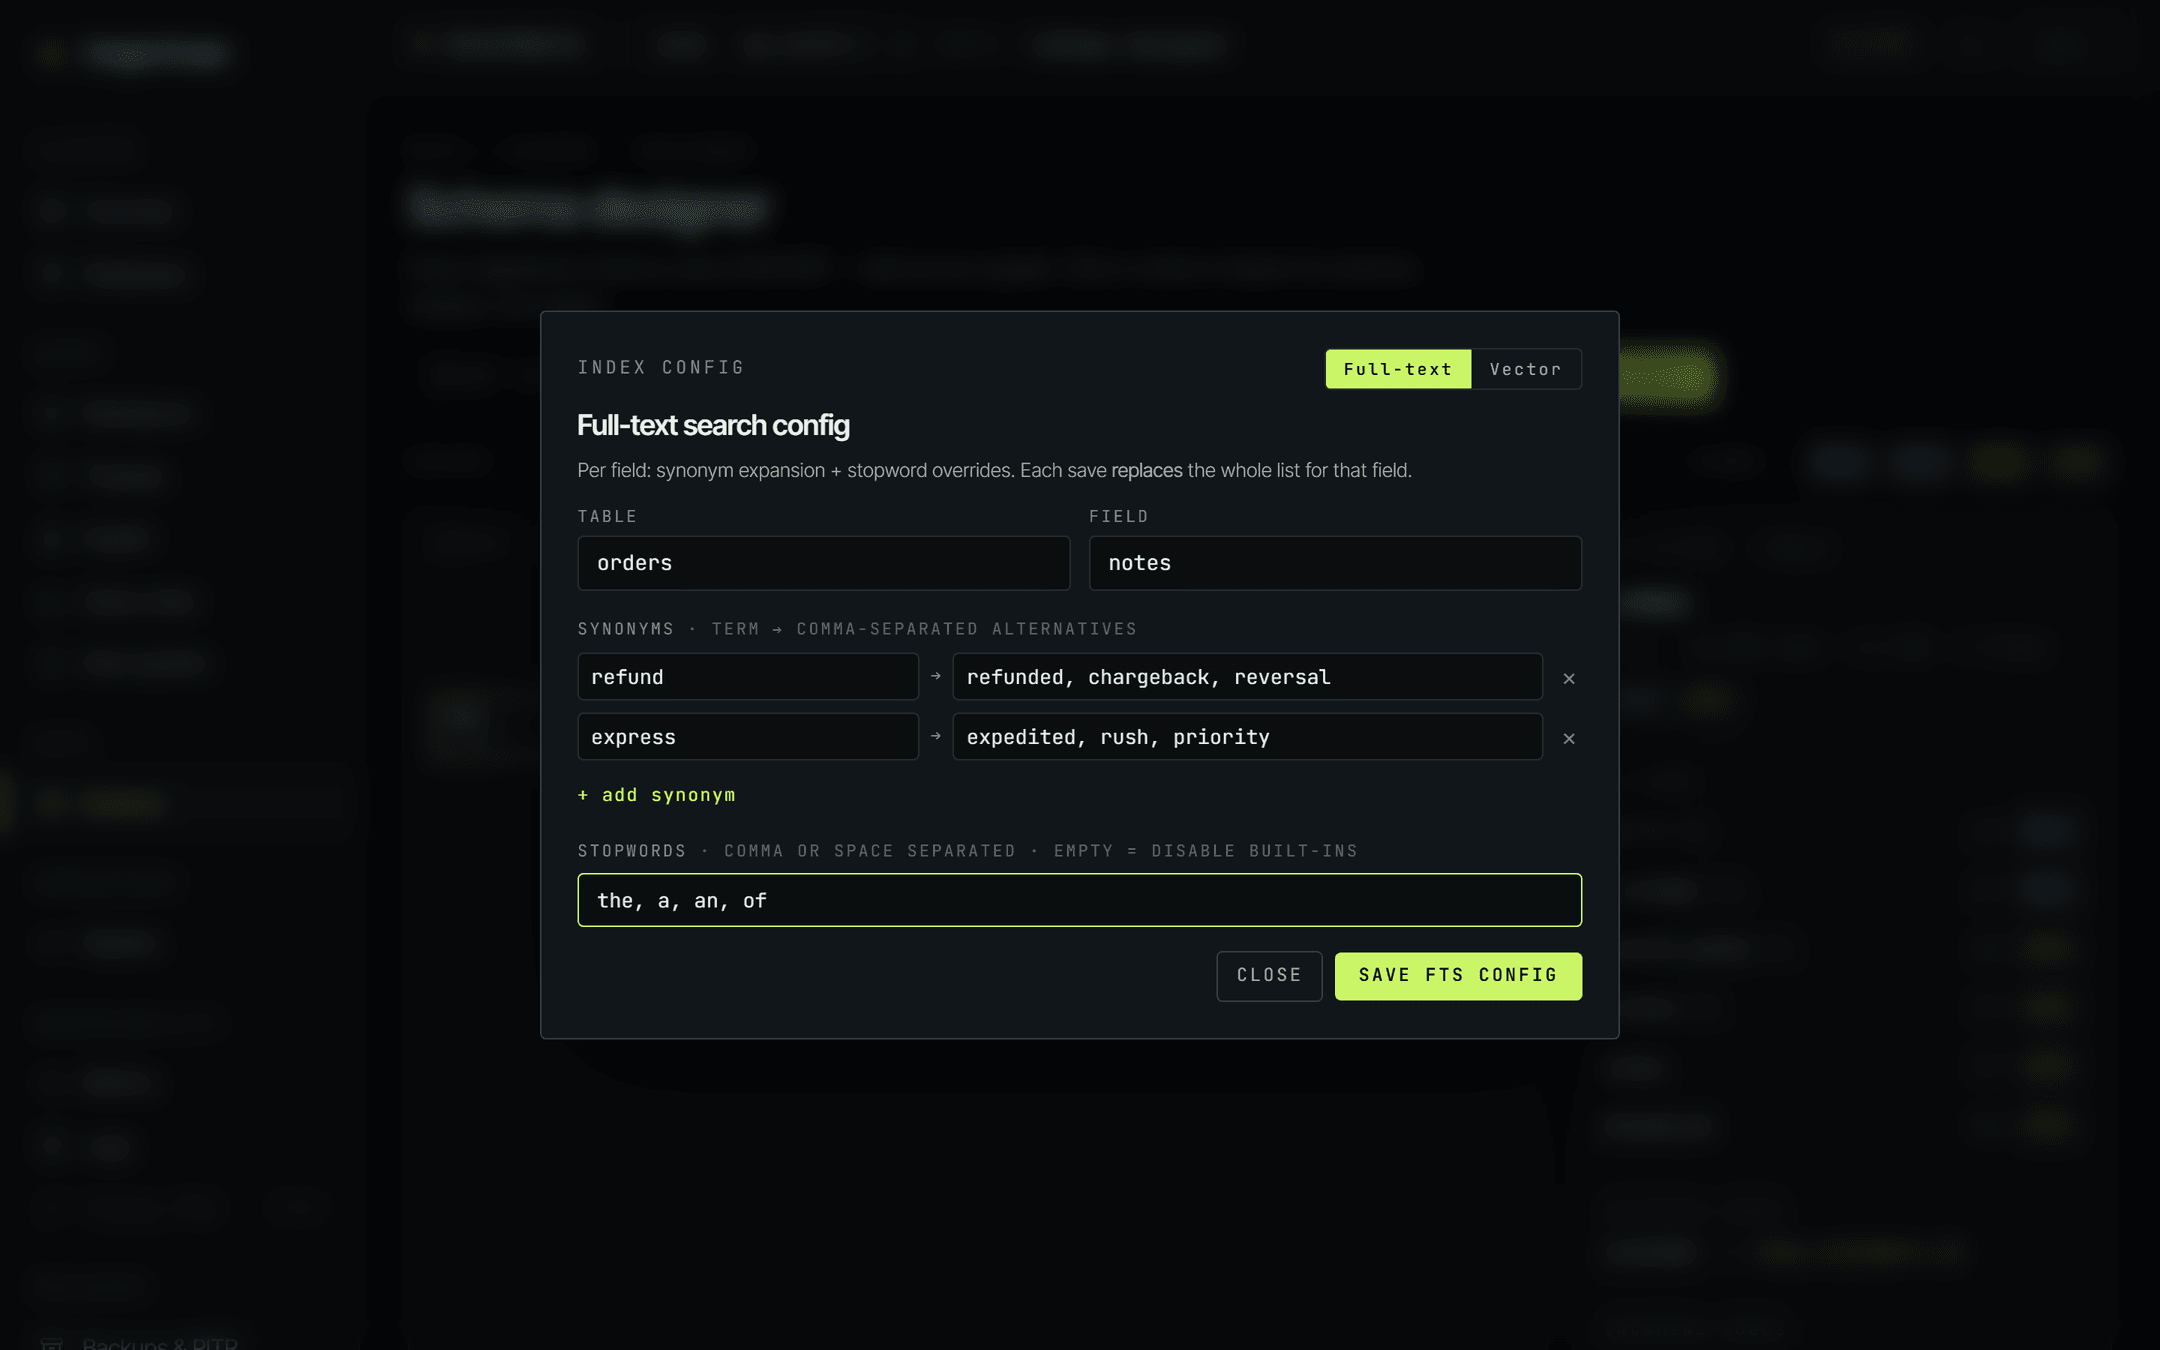
Full-text
Configuration is per field: you name a table and a field, then set two things.
- Synonyms - a term on the left, its comma-separated alternatives on the right. + add synonym adds another pair.
- Stopwords - comma- or space-separated. Leaving the field empty disables the built-in stopword list for that field rather than doing nothing.
Save FTS config writes it. Each save replaces the whole list for that field - it isn't a merge, so send the full set every time.
Vector
The Vector tab is upfront about how vector tables work today: they are created and configured on the first insert. Dimension, metric, index family and quantization ride along with that first write - there is no separate "create vector table" step, and no Save button on this tab.
So the tab is a builder for that first call. Pick the settings and the exact request updates live underneath, with a copy button:
- table and dim - the vector table's name and the embedding dimension.
- metric -
cosine,dot,l2ormanhattan. - index -
hnsw,ivforivf_pq. - quantization -
none,scalarorbinary.
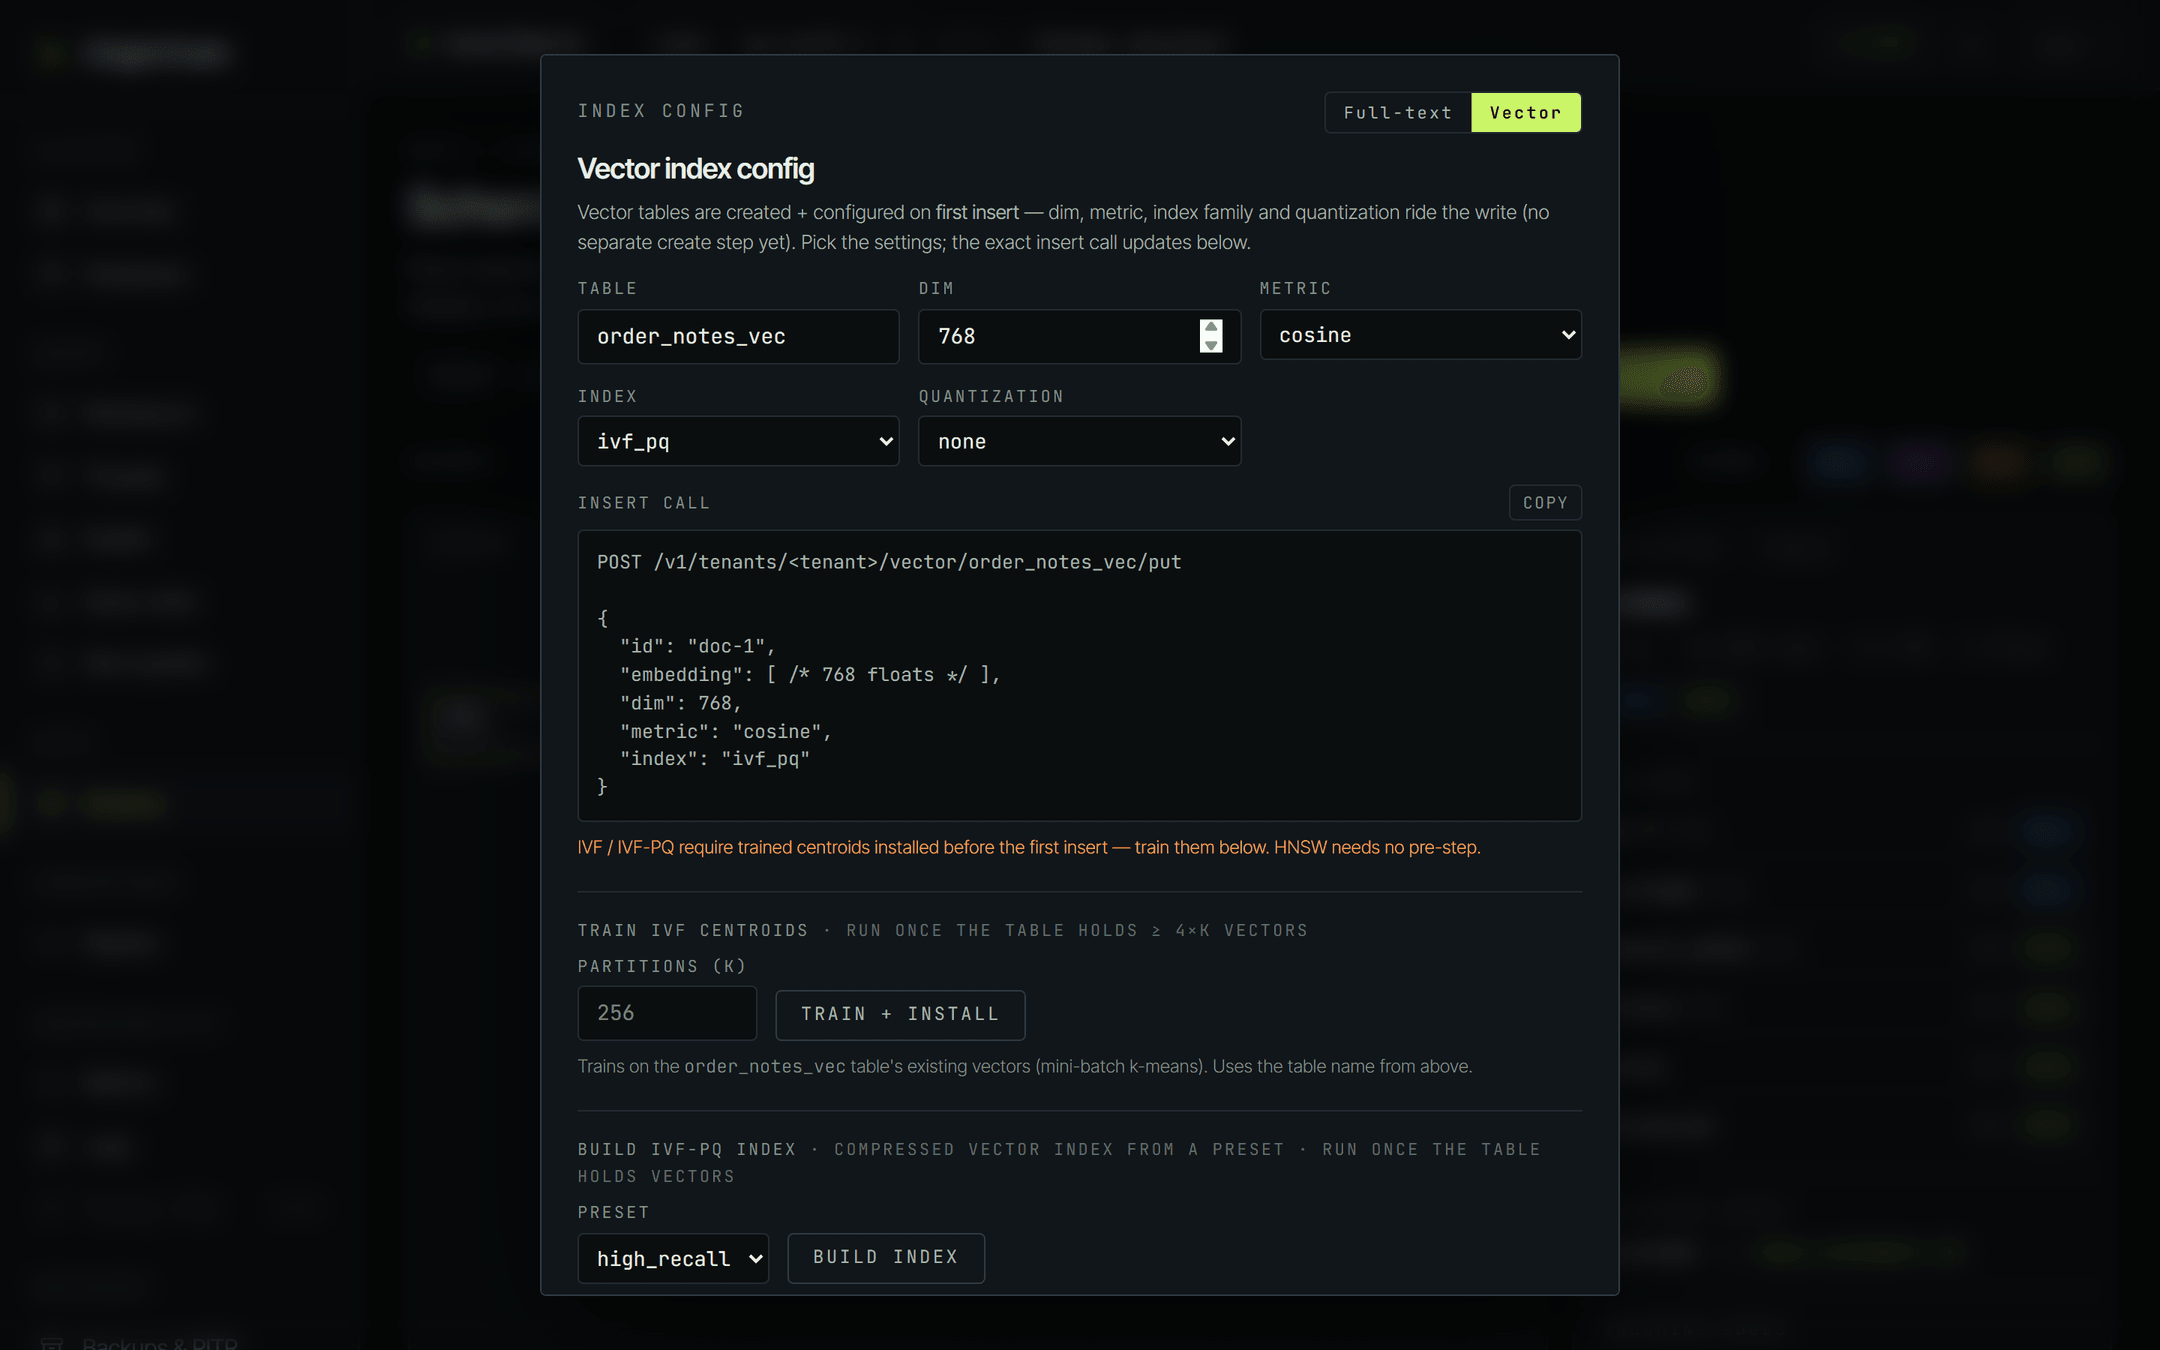
Both of these run against the engine when you click them - unlike the snippet above, which is only a template to copy.
- Train IVF centroids - set
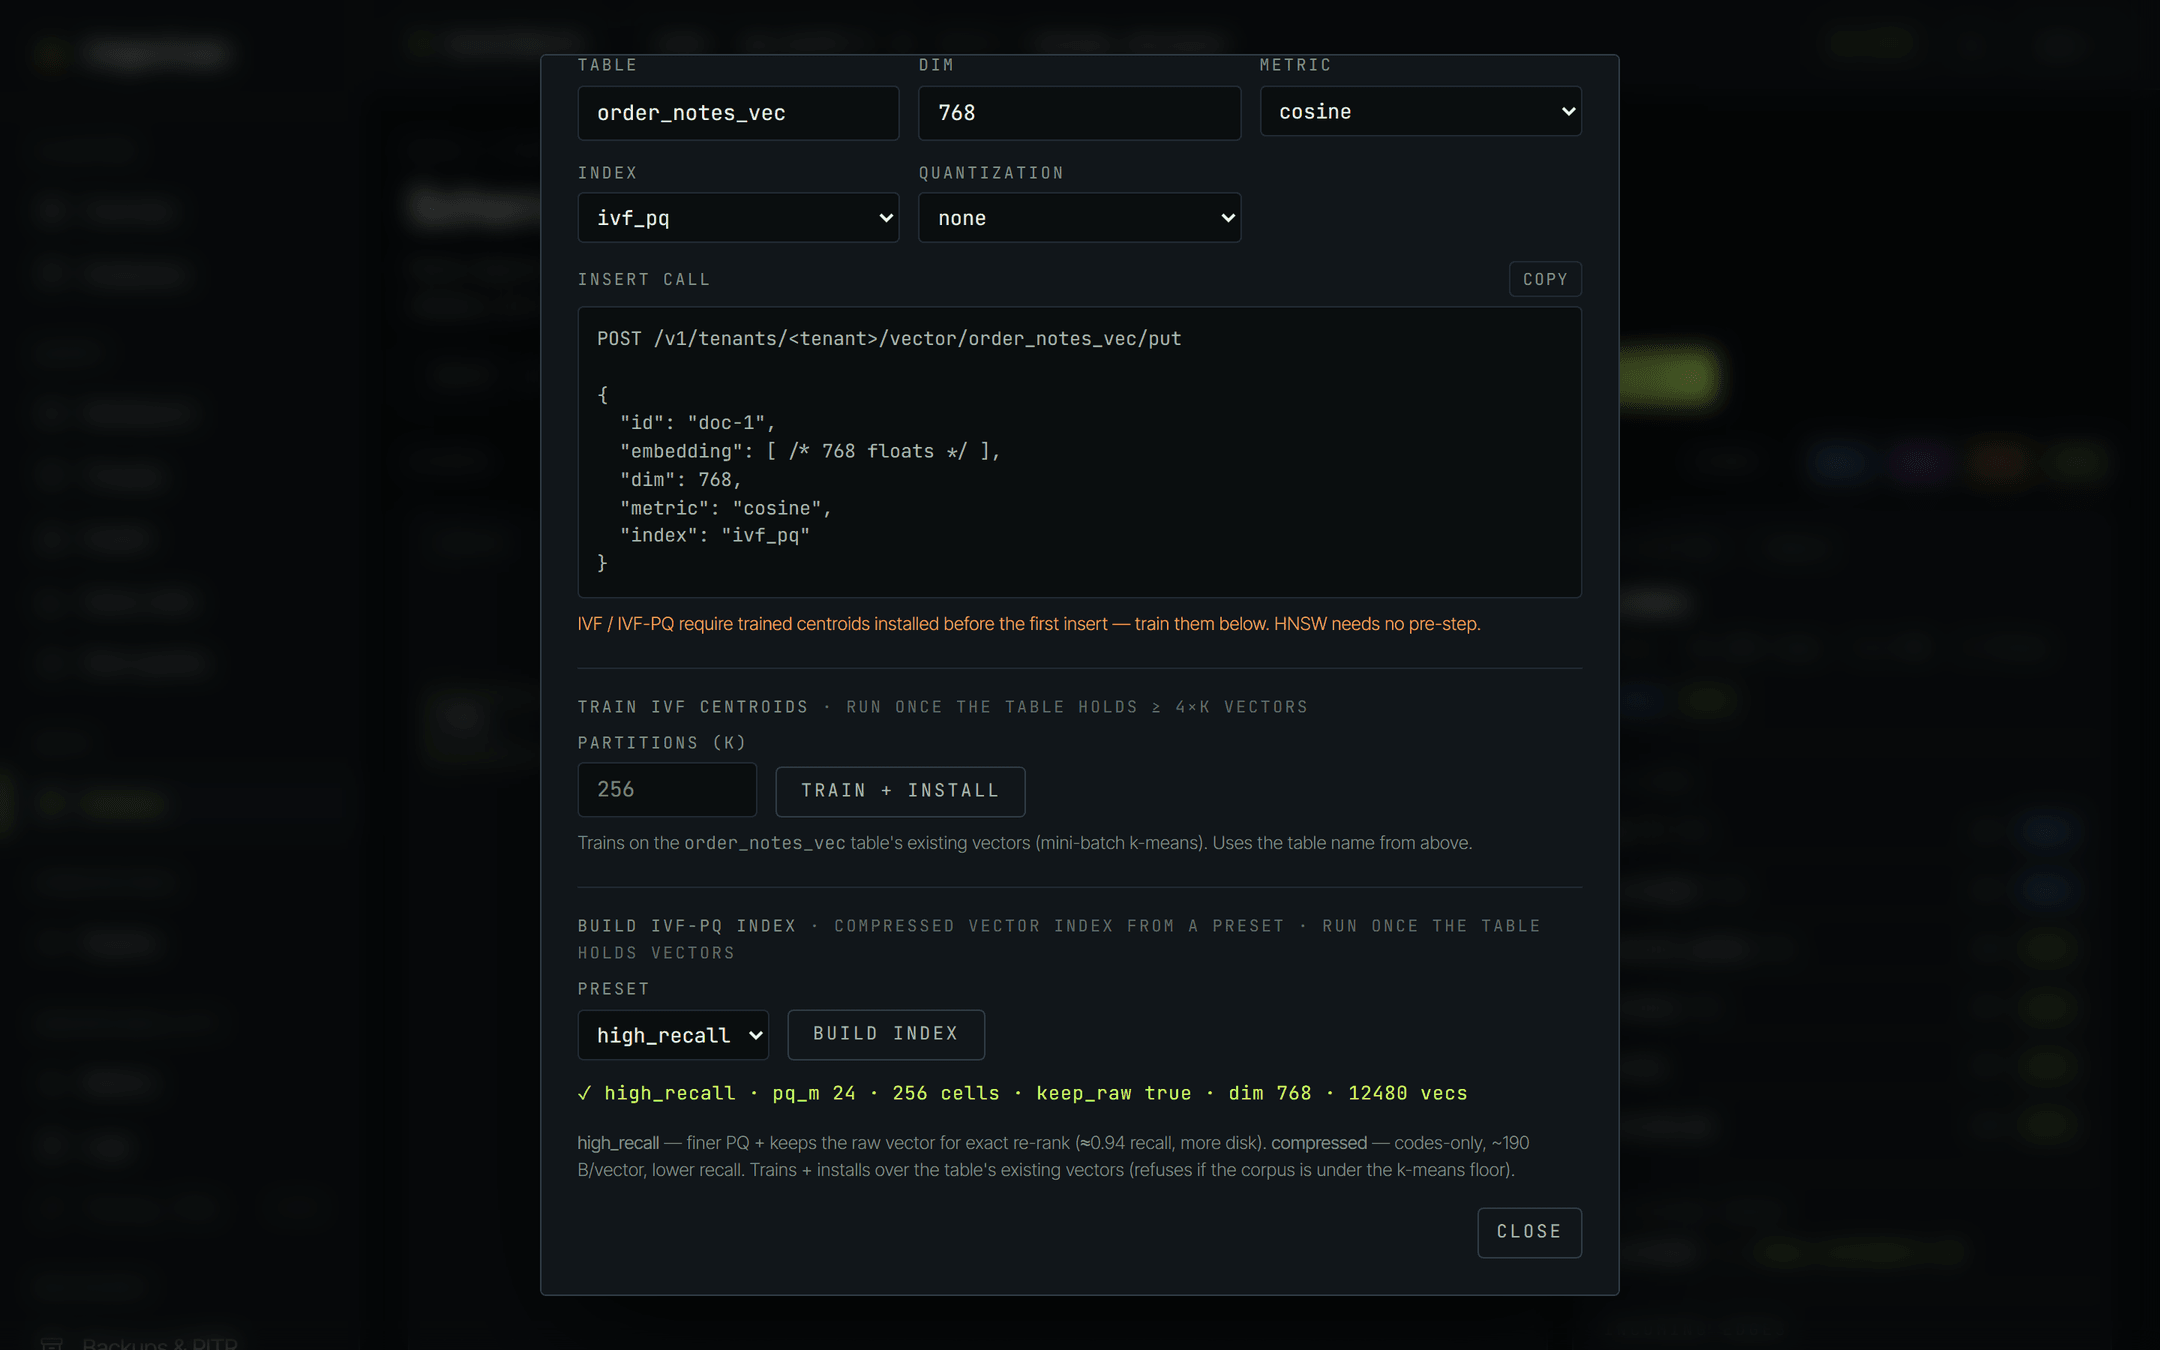
partitions (K)and click Train + install. It runs mini-batch k-means over the vectors already in the table named above. Run it once the table holds at least4 × Kvectors. - Build IVF-PQ index - pick a preset and click Build index. It trains and installs a compressed index over the table's existing vectors, and refuses if the corpus is under the k-means floor.
| preset | what it does | pick it when |
|---|---|---|
| high_recall | Finer product quantization, and it keeps the raw vector so results can be re-ranked exactly. Roughly 0.94 recall. Costs more disk. | Answer quality matters more than footprint - search over documents users read, recommendations you'd notice getting worse. |
| compressed | Codes only - no raw vector kept. About 190 bytes per vector. Lower recall as a result. | The corpus is large and storage is the constraint, or approximate neighbours are good enough for the next stage of your pipeline. |
When the build finishes, the console prints what the engine actually installed next to the button - the preset, the PQ sub-quantizer count, the number of cells, whether the raw vector was kept, the dimension, and how many vectors it trained on.
For the query side - top-k search, filters, and the metric trade-offs - see Vector search. For full-text querying, see Full-text search.
Inspect the table.
Click a node on the canvas, then Open table detail → at the bottom of the right rail (the same link appears in the corner of the canvas). The detail page leads with five tiles - rows, files · segments, on disk, columns, edges in / out - and six tabs: Overview, Columns, Indexes, Edges, Sample, Manifest.
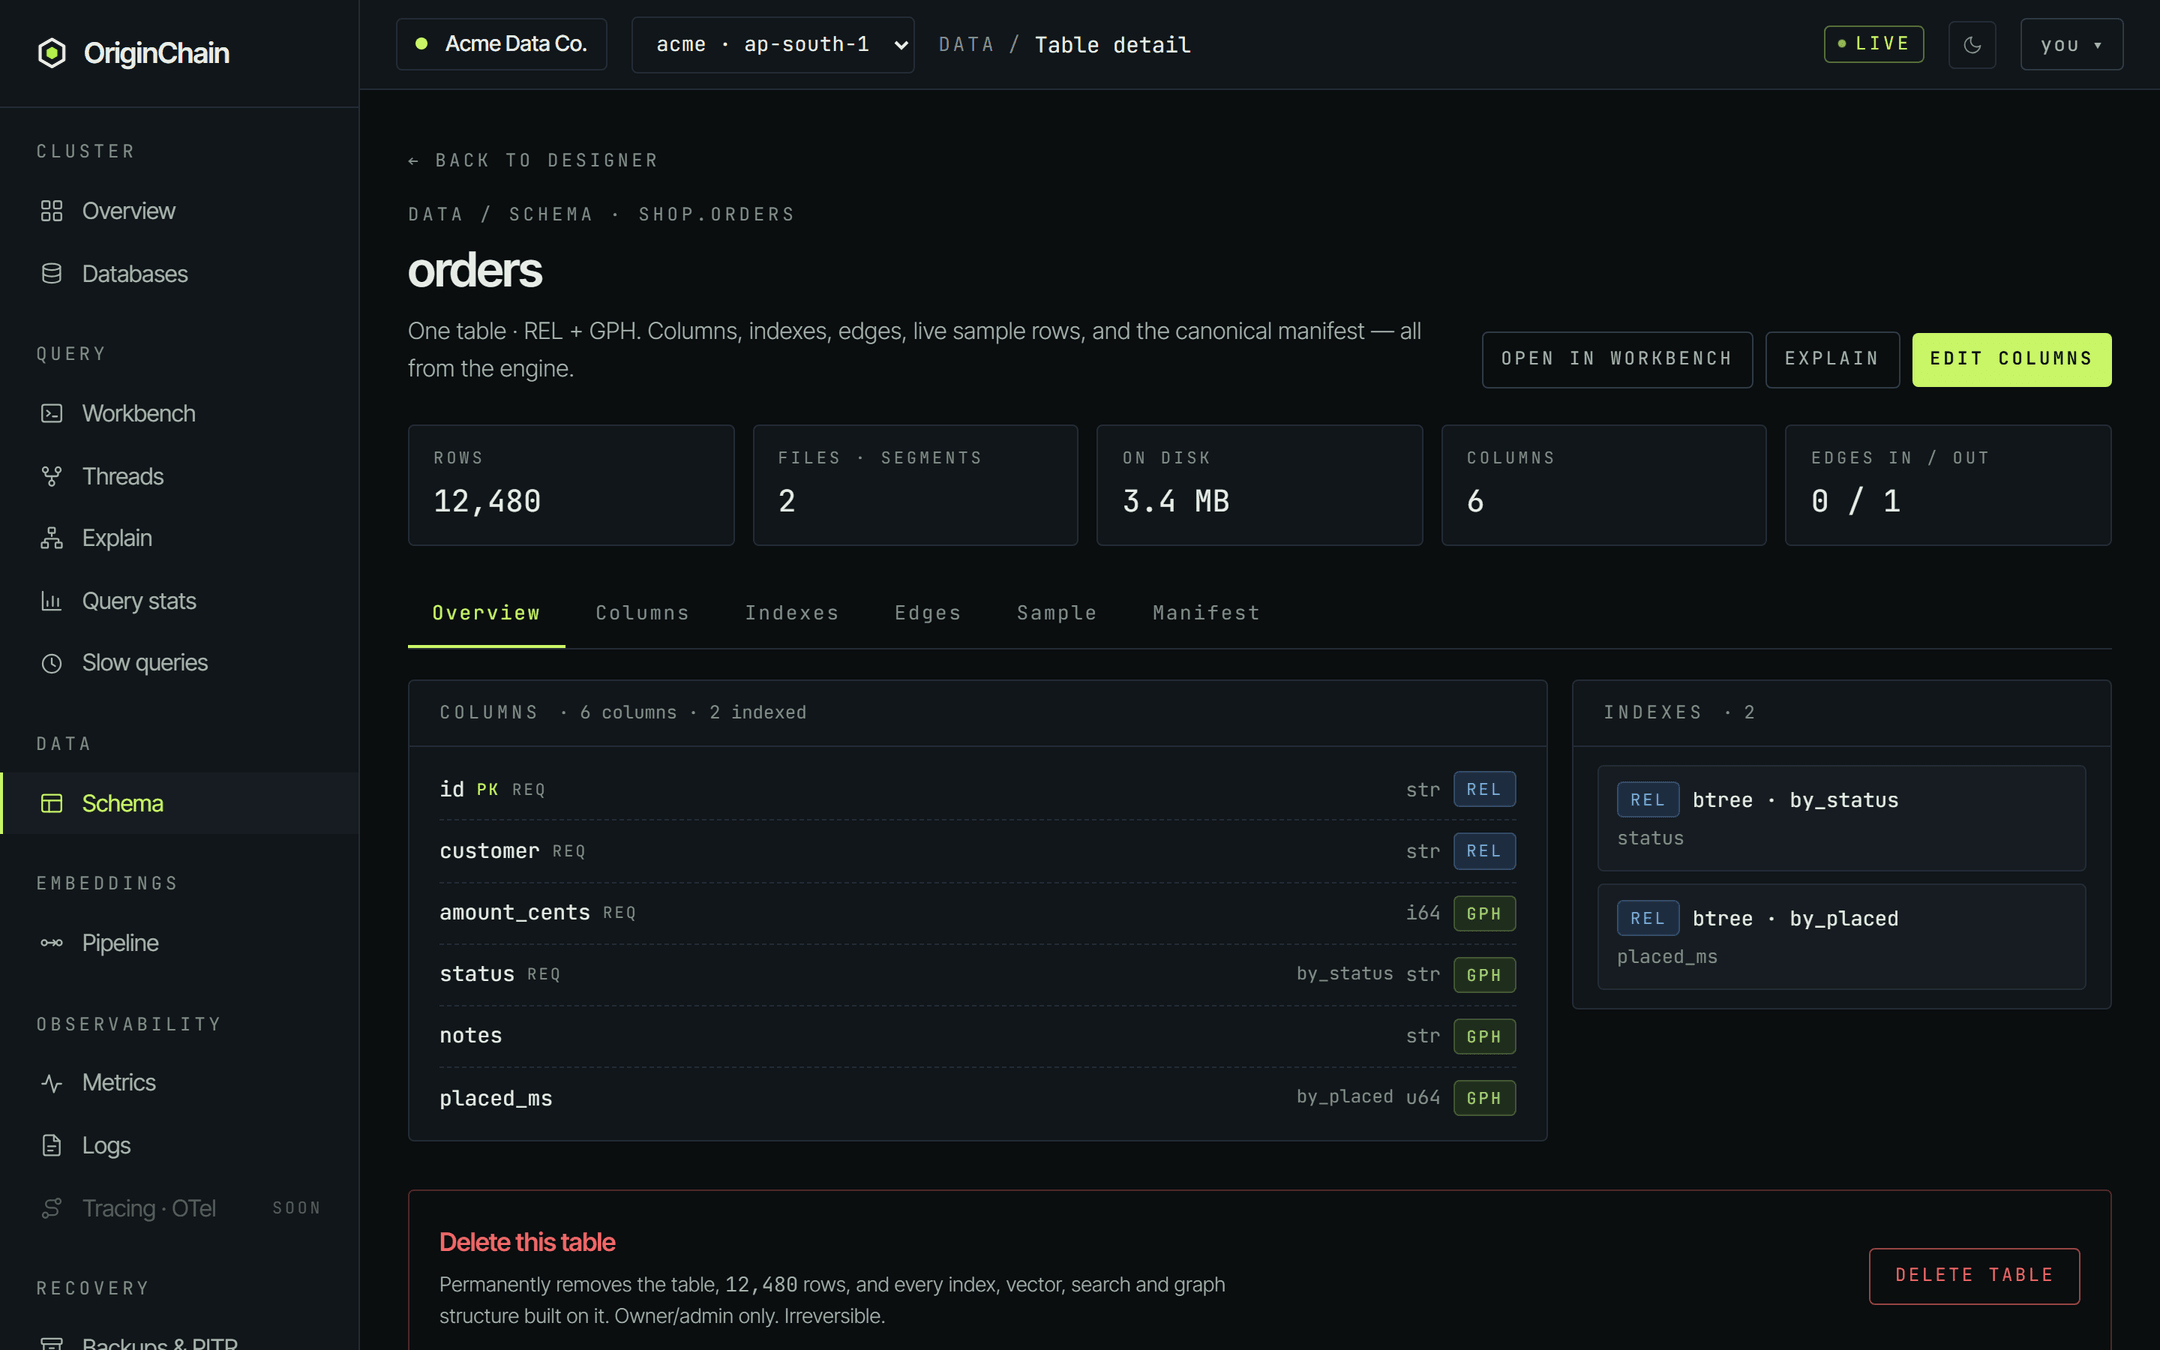
Sample runs a live SELECT * … LIMIT 10 against the table - the quickest way to confirm a write landed. Manifest shows the canonical TOML the engine holds, which is the authoritative answer to "what is this table, really".
Edit columns.
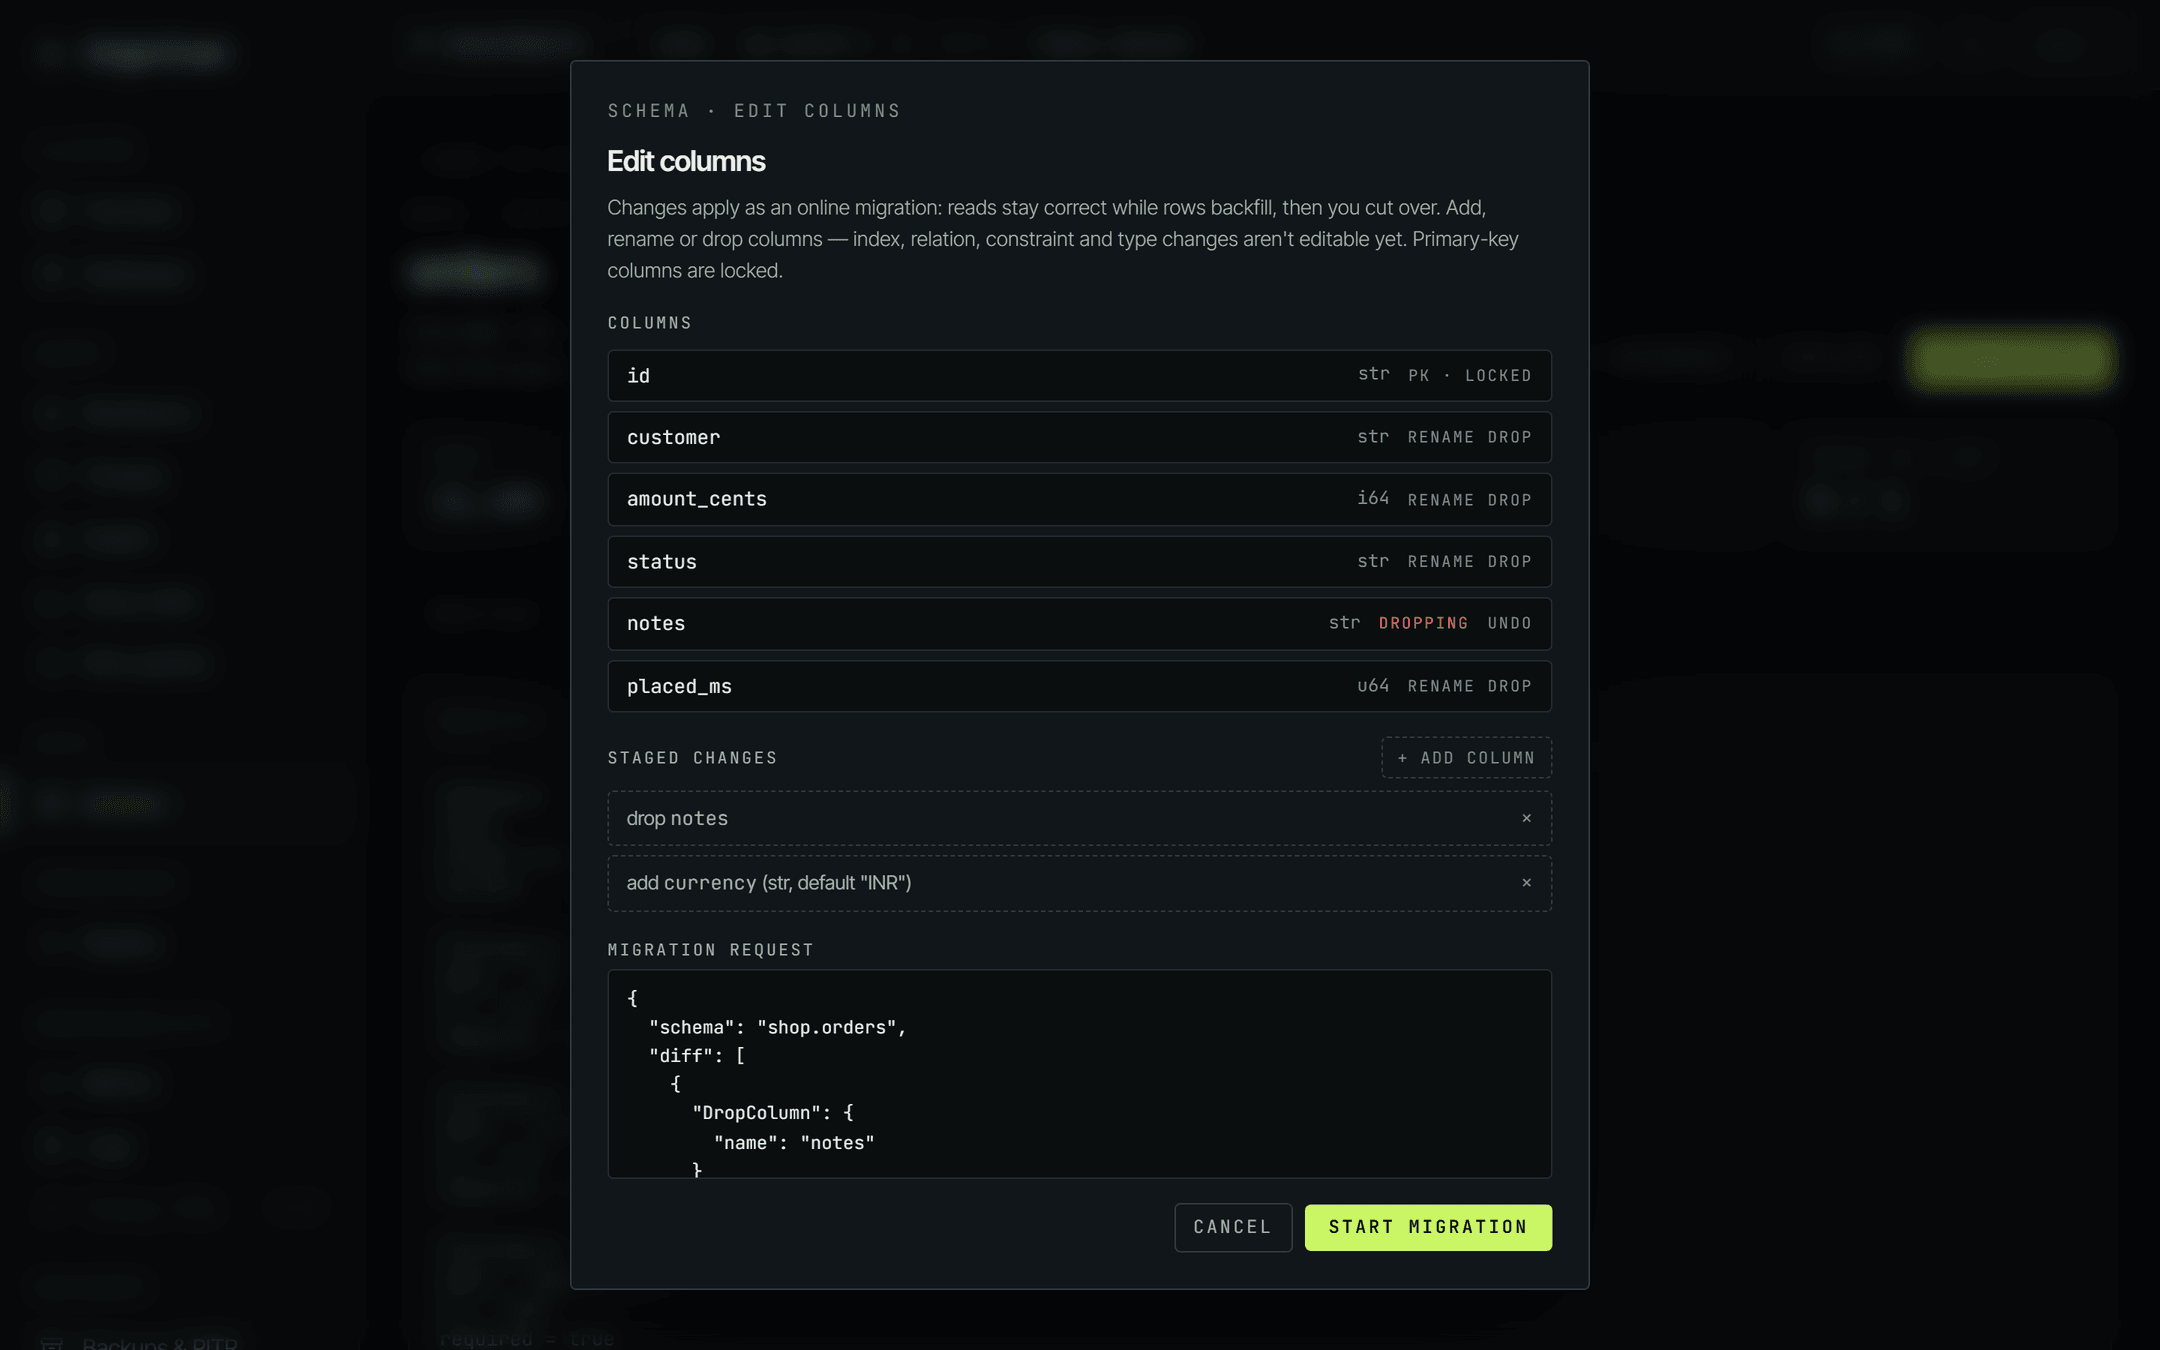
Edit columns on the table detail page opens a migration builder. You stage changes, review the exact request, then start it - reads stay correct while rows backfill in the background, and you cut over when it's ready.
Be clear about the boundaries, because the dialog is:
- You can add a column, rename one, or drop one.
- You cannot change a column's type, or edit indexes, relations or check constraints. Those aren't editable from the dashboard at all.
- Primary-key columns are locked. The PK row shows
pk · lockedand has no rename or drop control. - An added column needs a default, and its type comes from a shorter list than the register dialog offers:
str,i64,u64,f64,bool,bytes. - Renaming a column that a relation is built on raises a warning in the dialog before you submit.
Once a migration is running, a panel appears at the top of the table page with its state and version change - v1 → v2. The states are Pending, Validating, Backfilling, CutoverPending and Completed, and the buttons follow the state: Boost backfill while backfilling, Abort while it's still in flight, and Cut over when it reaches CutoverPending.
A migration does not finish on its own. It stops at CutoverPending and waits for you to press Cut over. Until you do, the table stays on the old version - and Edit columns is disabled, so you can't start a second migration on the same table.
Delete a table.
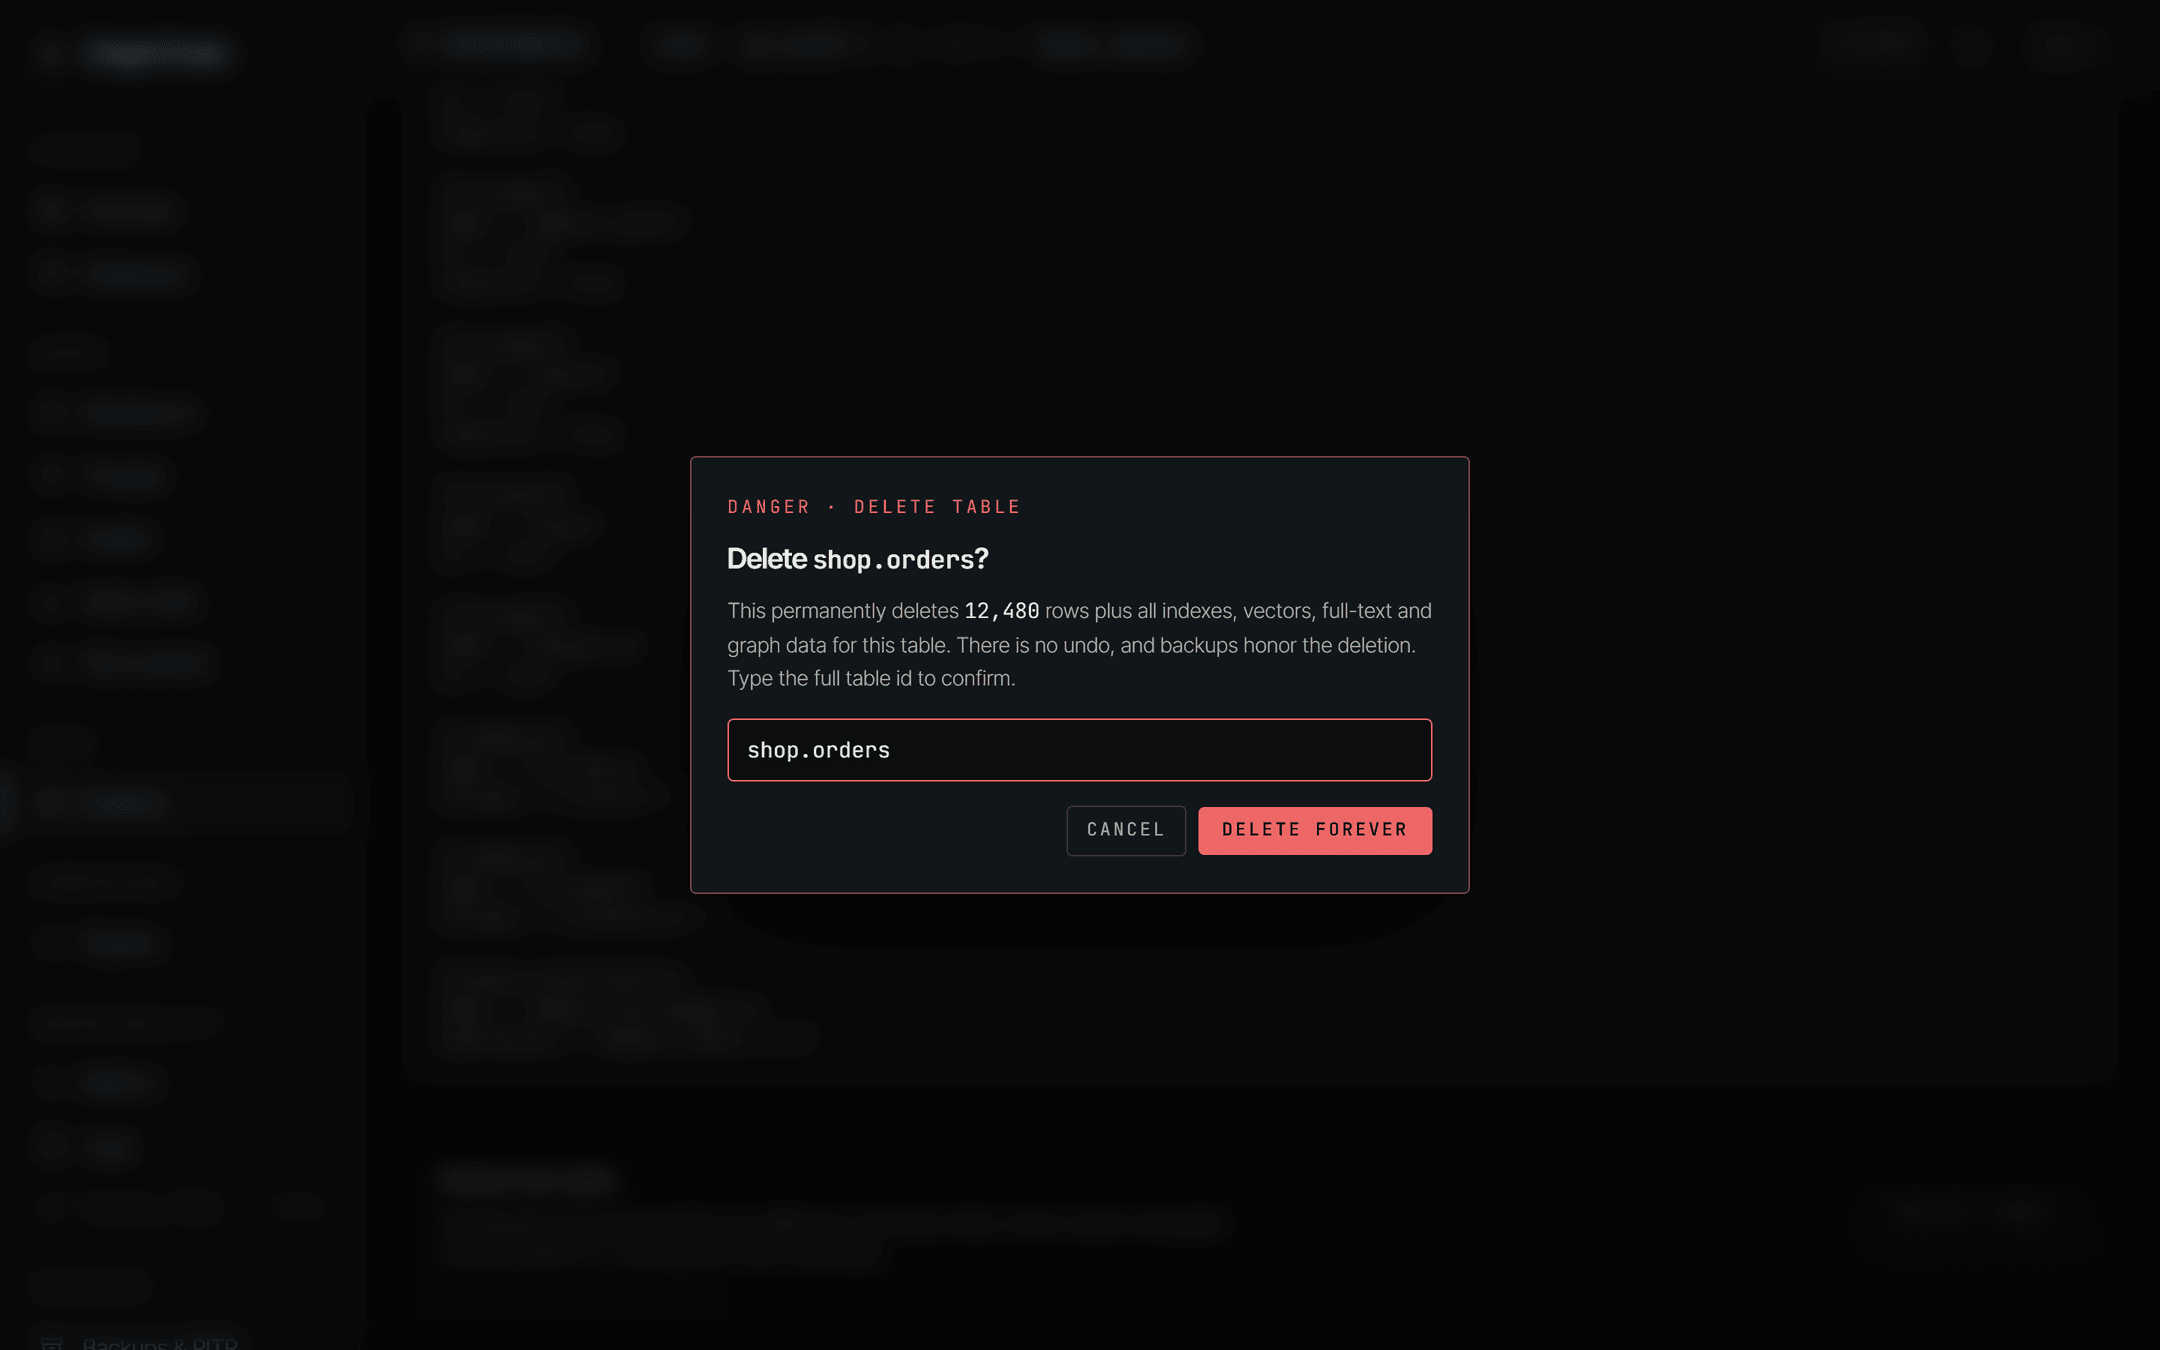
At the bottom of the table detail page there's a red Delete this table panel. It removes the table, every row in it, and every index, vector, full-text and graph structure built on it. It's owner/admin only, there's no undo, and backups honour the deletion.
The confirmation is type-to-confirm: the dialog names the table, shows how many rows will go, and keeps Delete forever disabled until you type the full table id - namespace included. A near miss like shop.order leaves the button greyed out.
Good to know.
A relation's target table has to be registered before the table that points at it. Build shop.customers first, then shop.orders with its placed_by relation - not the other way round.
There's no console control for changing a column's type, adding or removing a secondary index, editing a relation, or editing a check constraint after registration. If you need one of those, the honest answer today is: register a new table with the shape you want and move the data across. The Schemas and HTTP API references cover what the API itself accepts.
The row figure on the canvas and the rows tile come from a live counter that can read high after a lot of updates, because an update counts like a write. Recount in the designer toolbar recomputes the exact numbers and runs off the write path, so it's safe on a busy instance.